Joan's web log
Project: Capsule. A small viewer for omnidirectional stereoscopic images. The target device is the Oculus Rift, the image reprojection is done in CUDA. Download and discussion thread at Oculus forums.

Introduction
Capsule is a small viewer for omnidirectional stereoscopic images. The target device is the Oculus Rift, the image reprojection is done in CUDA.
This project was started to scratch a triple itch :
- I wanted to experience the images created for the Render the Metaverse contest on my DK2 ;
- I wanted to be able to very quickly check for stitching artifacts, binocular rivalry, depth and eye comfort in any omni-stereo image ;
- I wanted to improve my CUDA and GPGPU programming skills.
With that in mind, I set myself up to build a small omni-stereo renderer in CUDA so that I could project these images on the Rift and learn a few things along the way.
The “Render the Metaverse” contest has been organized by OTOY this summer and has given birth to the most impressive collection of fully spherical stereoscopic images to date. Many of the works are excellent and leverage the ability to create photorealistic images of imaginary or impossible worlds. Impossible-yet-photorealistic is also what I loved to do back in my photo-remix days, it’s a really powerful strategy to awe the viewer.
Here is a screenshot of the desktop-side of the software.

Fig. 1. Capsule omni-stereo image viewer desktop window.
The Headset side of the software is just the full spherical images. There is no in-VR user interface whatsoever.
Project scope
I have voluntarily limited the scope of the project to be able to work everything out in a relatively short period.
- Static vs Dynamic: The program is limited to static content. This is to focus on the peak quality content without having to deal with frame queues, buffering and other joys of video. Video is currently quite behind in terms of quality because the hardware and file transport levels aren’t ready for VR yet.
- Stereoscopic vs monoscopic: Although monoscopic content is supported, there is no particular effort put into it. I think stereo is a fundamental part of the VR experience and is where I personally draw the line. Monoscopic 360° content can be very appealing and a VR headset is certainly the best way to experience it, but the added dimension of depth is what changes the game for me.
- Spherical vs Reduced FOV: I think hemispherical content will definitely have a place in VR, especially for story telling. For this project however, I’m focusing on the fully immersive experience.
Oculus/OpenGL/CUDA interop
Oculus ↔ OpenGL
The interoperability between the Oculus SDK and OpenGL is described in the Oculus SDK documentation at Rendering Setup Outline and in the OculusRoomTinyGL sample.
The basic principle is that we ask the runtime to allocate a set of GL textures for each eye. During rendering we will cycle through the set, drawing into a different texture from one frame to the next. Note that the textures are created by the runtime, it’s not possible to provide our own texture id from textures we would have created elsewhere.
OpenGL ↔ CUDA
The interoperability between OpenGL textures and CUDA is described in the CUDA programming guide at 3.2.12.1. OpenGL Interoperability. The basic principle is that an OpenGL texture can be mapped into CUDA under the form of a CUDA Array and still be manipulated by both OpenGL and CUDA (not simultaneously). A CUDA Array is basically an abstraction level above either a CUDA Texture (for read only content) or a CUDA Surface (for read/write content).
Older graphics cards only support Texture and Surface references, and many tutorials use them. These need to be defined at compile time and make the code somewhat ugly and awkward. Texture and Surface objects are much more natural constructs to use. The relevant part of the programming guide is 3.2.11. Texture and Surface Memory. Surface objects are supported on adapters having Cuda Compute Capability 3.0 (GTX 600+, Kepler microarchitecture), which is still one entire generation of cards below the recommended specs for the Oculus Rift (GTX 970 - Maxwell microarchitecture), so this limitation is fine for the project.
Capsule is also using a CUDA Texture to store the actual image to be projected. There is no OpenGL interop going on here, it goes straight from the central memory to CUDA and is not accessed outside of CUDA code. For the eye buffer, since we need write-access, we must use a Surface object rather than a Texture object.
The complete path from an OpenGL texture to something we can draw onto from within a CUDA kernel is something like:
- Create a texture in OpenGL.
- Call cudaGraphicsGLRegisterImage to create the CUDA-side resource for the Texture.
- Call cudaGraphicsSubResourceGetMappedArray to map the resource to a CUDA Array.
- Call cudaCreateSurfaceObject to bind the CUDA array to a CUDA Surface object.
- Call surf2Dwrite to draw onto the Surface object and hence onto the OpenGL texture.
The resource must be unmapped so that the texture can be used by the OpenGL side.
A simple trick for learning how this stuff works is to search for these functions and related functions on the whole tree of CUDA code samples.
The final interop plumbing arrangement from Oculus to CUDA:
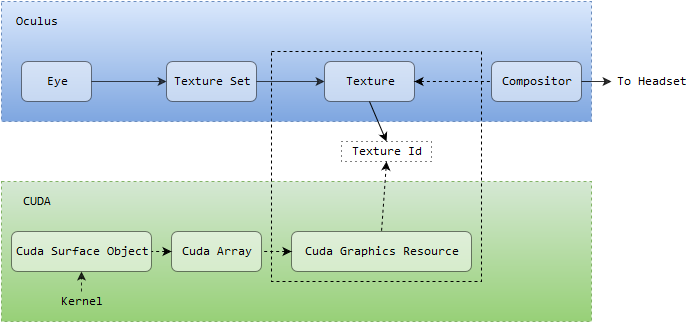
Fig. 2. Oculus to CUDA interop plumbing.
CUDA Kernels
Projection types
There are two CUDA kernels implemented. One for the equirectangular projection and one for the cubemap projection.
For the cubemap projection we need to use a set of conventions for face ordering and orientation. The de-facto standard in VR is coming from the format used by Oculus in-house image viewer for the Samsung GearVR and is the following:
- The unfolded cube is stored as a long strip of faces.
- Faces are ordered as +X, -X, +Y, -Y, +Z, -Z.
- Top and Bottom faces are aligned to the Z axis.
- All faces are flipped horizontally.
- For stereo the right eye strip is stored after the left one, creating a 12-face long strip.
The choice of kernel to use is based on the aspect ratio of the image. A stereo equirectangular image has an aspect ratio of 1:1 for the Top-Bottom configuration and of 4:1 in the Left-Right configuration. A stereo cubemap image has an aspect ratio of 12:1. The monoscopic versions are respectively 2:1 and 6:1. If we decide not to support variations within these configurations, like Bottom-Top or other cube faces ordering, the projection can be automatically inferred from the aspect ratio of the image.
Projections
The Oculus runtime provides the eye camera (off-axis) frustum as a FovPort structure. This is a set of 4 numbers representing the half-FOV in the up, down, left and right directions around the camera axis. Knowing the size of the buffer in pixels, we can compute the camera center and focal distance. Then, using these camera intrinsic parameters we can find the direction of rays starting at the camera projection center and passing through any pixel of the eye buffer. This represents the first two steps of the algorithms and could actually be pre-computed into a kind of normal map for the eye. The full approach is described below.
Equirectangular kernel
For each pixel location in the eye buffer:
- Back project the pixel from 2D to 3D coordinates by converting it to homogenous coordinates.
- Normalize the homogenous coordinates to get a direction vector.
- Rotate the direction vector to account for headset orientation.
- Convert the direction vector (equivalently, a point on the unit sphere) to spherical coordinates.
- Convert the spherical coordinates to image coordinates.
- Fetch the color at the computed image location (with bilinear interpolation and optional fading).
- Write the final color at the pixel location.
Cubemap kernel
For each pixel location in the eye buffer:
- Back project the pixel from 2D to 3D coordinates by converting it to homogenous coordinates.
- Normalize the homogenous coordinates to get a direction vector.
- Rotate the direction vector to account for headset orientation.
- Find the largest component of the direction vector to find the face it is pointing to.
- Project the direction vector onto the selected face.
- Adapt the signs of the remaining two components for use as 2D coordinates on that specific face.
- Shift the x coordinate to account for the face order within the entire cubemap.
- Fetch the color at the computed image location (with bilinear interpolation and optional fading).
- Write the final color at the pixel location.
Note that the cubemap reprojection only involves simple arithmetic and is slightly faster than the equirectangular one in my implementation.
Performances
Perf/Quality threshold in VR
While in a traditional application a low framerate will make the experience less enjoyable, in VR it will make the user physically sick. Consequently, we must pull the performance-quality trade-off cursor to the performance side first. There is a threshold of performance we cannot slide past under. It’s only once the framerate and latency requirements are met that we can start considering image quality.
In addition to issues caused by poor performances, there is a whole bestiary of visual artifacts that are VR-specific and that regular applications don’t have to bother about. Judder, incorrect depth, head tracking latency, object distortion, etc. Each come with its particular cues but the important thing is that issues are hiding each other. You can only really understand what it feels to experience the distortion effect caused by the lack of positional tracking when you no longer have judder caused by poor framerate.
The talk “Elevating Your VR” by Tom Heath at Oculus Connect 1 in 2014 is still what I consider the best talk about VR-specific artifacts, how to become aware of them and how to fix them. It should be required viewing for anyone working in VR (1H05), slides only (PDF).
Headlocking
For Capsule, thanks to the image-based rendering approach, the required 75 fps are easily reached on modern GPUs. Unfortunately, distortion issues due to the lack of positional tracking cannot be fixed within the confines of omni-stereo images (Light fields will later save the day).
I found that the worst remaining offender was headlocking during image transitions. In a first test version I was loading the next image in the same thread as the rendering one. The display stopped refreshing during the few hundreds of milliseconds required to load the image from the disk to memory and then to the GPU. This caused a headlock: no matter where you turn your head, the entire picture is coming with it, it feels like the whole world is spinning around, and it immediately causes motion sickness.
Spawning a thread to side-load the next image wasn’t sufficient though. The mere act of spawning a thread, an operation costing a few ms, caused a glitch. A single frame miss but if you happen to rotate your head just at that moment, you definitely see the hiccup, and it’s not pretty. I ended up having a long-lived thread with the same lifespan as the whole application, dedicated to loading the next image in the background. I haven’t implemented asynchronous GPU memory load though, so the upload between central memory and video memory happens during the peak of the cross-fading between the images.
Profiling
The frame budget for the DK2 and CV1 are 13.3 ms and 11.1 ms respectively. The Oculus runtime and compositor will eat a part of that budget. My goal was to get under 5 ms per projection to fit both eyes inside 10 ms. CUDA has a useful profiler integrated with Visual Studio. It’s very easy to test various approaches in the Kernels and immediately check the impact with actual stats.
Of the two kernels, the equirectangular one is slightly slower than the cubemap one. This is mostly due to the trigonometry involved in going from a 3D location on the unit sphere to spherical coordinates. The cubemap inverse projection can entirely be solved with simple arithmetic.
After a few roundtrips of profiling and optimization, the performance was better than I expected, running largely inside the bugdet for the default sized eye buffers. I pushed the pixel density to 2x to explore peak quality and made it a user-controlled option. Despite the comment in the SDK code, the effect of 2x pixel density is sensible and produce much less aliasing crawlies when looking around. This is particularly welcome on the DK2 because we tend to constantly slightly move the head to minimize the screen door effect.
The performance is not influenced by the size of the input image (as long as it fits in the dedicated GPU RAM). Fig. 3. Shows a profiler run summary where the eye buffer is sized at 2364×2927 px, about 7 million pixels, corresponding to my HMD profile at 2.0 pixel density. The equirect kernel runs in 2.9 ms on a 8000×8000 px source, and the cubemap kernel runs in 1.9 ms on a 24000×2000 px source. This is on an Nvidia GTX 660.
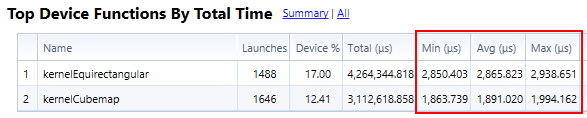
Fig. 3. Profiler run summary for 2364×2927 eye buffer on an Nvidia GTX 660.
There is still room for experimentation. The kernels both start by computing the pixel’s normalized direction, prior to applying the head rotation. This never change and could be stored in a map. It would replace a few arithmetic operations by one memory fetch.
Future plans
There could be many avenues of improvement for this project. Supporting ambient audio, short animated sequences, ultra high resolution content, zooming, in-VR file explorer, or even implementing light field rendering right into it. However I wanted this project to be self-contained and it will likely continue this way, simply fulfilling its original purpose of quickly experiencing omni-stereo images on the DK2. The more ambitious features will be in more ambitious softwares.